Simple roof truss for shed. Trusses are built for a sound roofing system on various buildings, but in simple projects like a shed, a truss can be built without the need for any engineering requirements and just simply some lumber.
Flat trusses are the most common type of roof truss, accounting for 30% of the market share. They are simple and easy to build, and they are a good choice for homes with low-slope roofs. Gambrel trusses are also a popular choice, accounting for 20% of the market share. They have two slopes, which gives them more headroom and storage space than flat trusses. Bowstring roof trusses are less common, accounting for 15% of the market share. They are a good choice for homes with long spans, such as barns or warehouses. Dual-pitched roof trusses are the least common type of roof truss, accounting for 35% of the market share. They are a good choice for homes with steep roofs, such as A-frame homes.
Roof trusses for a shed are simple enough without having to use any specific engineering instructions. You only need tools and materials that can be bought from your local hardware store, plus you can do it on your own.
Roof trusses are used to support the shingles and plywood of a support so that it becomes waterproof. For it to work well, you will have to plan it carefully since the trusses require strange angles and each of them has to perfectly fit the structure they are attached to.
Here’s how to make a roof truss for a shed, so you can start your little project.
- Plan it carefully
The truss is the support of the roof of your shed and for that, it is important that they are planned carefully so that you know exactly what step you have to do next. In making shed roof truss plans, it is important that you are able to meet the snow load, wind load and other requirements for the structure.
The standard wind loads for designing and building structures is that horizontal winds should not be less than 15 psf and net uplift load should not be less than 9 psf, while the standard for snow load is a minimum of 21 lbs. per square foot (1 kg) Pascal or higher.
- Design of the Shed Roof Truss
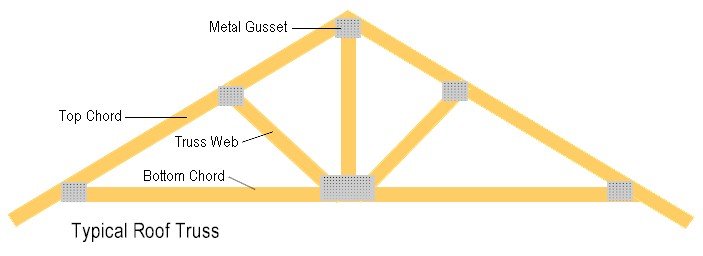
Since you’re making roof trusses for sheds, you must know at least some of the basics and the elements that you need for building your design using your roof truss plans for sheds. The basic elements that you need on how to make roof trusses for a shed include the following:
- Raft member (top chord)—this is the main part of the truss which runs along the underside of the truss which supports the decking.
- Joist member (below chord)—another main part of the truss which runs along the lower side in-between the supports
- Diagonal braces—these are what support the truss and hold them together.
- Gussets—1/2 inch pieces of plywood used for covering the three ends of the truss
- Peak—the highest part of the truss
- Overhand—this is a part of the truss structure which runs past the outside walls of the building
- Cantilever—this is a beam that is anchored at one end of the truss and projects into space.
When making roof trusses for a shed, it is essential that you know these elements and your design is detailed when it comes to them.
- Choose the appropriate Lumber for your Roof Truss
Although you have an excellent truss design, if your materials are not appropriately selected, it will not be sturdy enough to last long.
As such, you have to choose the right lumber which is the main material that you need for your roof truss. Over lumbers like white pine and spruce, lumber made from fir or yellow fine are much preferred for their high density.
Boards of size 2×4 inch are suitable especially to lightweight truss if you are able to design and fabricate the bracing, as well as the member connections.
You should look at the straightness of the lumber as well. Those that are warped, crooked and twisted lumbers are not good for trusses while those that are slightly curved or with crown can be used if the crown is faced upward when the truss is installed.
Those boards that are straight grained and dense with only a few knots are mostly used for truss. It is also best if you can choose a lumber that has no apparent crack or split or barked edges.
Additionally, softwood lumbers tend to shrink after they are built and installed. With that, the lumber that you choose has to be kiln dried to avoid shrinkage.
How to Calculate Roof Trusses for a Shed
Once you have made the preparations that you need for your homemade roof truss, the next step that you need to do is to build it.
You already have the materials—lumbers, woods, plywood, saw, hammer, nails, screws, drill and wood glue. With all these things at hand, you can now start creating your shed roof trusses.
- You can start by measuring the slope of the roof. You have to accurately measure the slope as it will be the length of your truss’ rafters. Once you have calculated the length, you can decide the number of the trusses that you need and then double this number as it will be the number of the rafters.
- The rafters are cut from the wood (2 x 4) according to the length of the slope you measured earlier. Once they are cut, you have to add a plumb cut of a 45-degree angle cut at the top ends.
- Next, cut out the joist member or the below chord from another piece of 2 x 4 wood and in 45-degree angle.
- Then, create the gussets which will be used to cover the three ends of the truss. One of them covers the top of the truss while the other two covers those at the bottom. This means that you need to create at least 6 gussets to cover both sides of the truss.
- When everything is ready, you can now start assembling your truss. You can either build saw horses or just work on the floor to make it easy while you are working on assembling the truss. At first, the two rafters are laid at the floor with the two ends meeting at the corner. If you have cut them correctly, they should fit just fine. Then, you can slide in the bottom piece (joist) so that the angles fit together.
- When the truss is placed and secured, you can now start gluing the parts of the truss, as well as nail the gussets to each of the corners. When the glue has already dried, turn the truss over and then attach the other three gussets to each of the corners, including the top.
How to Install Roof Trusses on a Shed
When you install the truss, you have to put up a temporary bracing to keep the truss in place until it is permanently installed. Once you have installed the temporary bracing, you can now start to install your backyard shed’s truss. Follow these simple procedures on how to install roof trusses.
- Assemble all the trusses that you made and need for your shed in a level surface. Lay them in pair with the ends meeting and fastened with the use of gussets. Add with them a cross tie, which is a 2 x 4-inch board which runs in between the rafters and the height you have selected with the ends cut so that it matches the angles of the rafter.
- Next, put these cross ties near the rafter’s bottom, in case you do not care for an inside space or if perhaps you need some space for storage in the roof area. Then, you can place the cross tie in about halfway up of the rafter so that you can achieve more space inside. All of the trusses should be built this way.
- When installing them, you have to lift them to the roof upside down. You or your workers can then nail the truss in place in the roof with the guide of the temporary bracing. Before they are nailed, a level should be used to plumb the rafters.
- Start plumbing the rafters at one end and then proceed to the other. Plumb each of them each time that you go. You can add some studs to the end rafters of the truss in between the cross tie and the wall cap.
- Last, cover all the trusses with OSB sheathing that is nailed to each of the rafter in an interval of about 12 inches. This will attach your truss firmly to the roof, so you can be sure they are secured enough.
With these steps and procedures, you can now start to build your own trusses for your backyard shed. You don’t have to be specifically knowledgeable in engineering as making your own truss is simple enough if you follow the instructions above.
However, that does not mean that you don’t need the help of professionals. If there are things that have left you confused, it is still wise that you ask for some advice so that you can build your roof truss perfectly.
Of course, when building you homemade truss, safety is your first and foremost concern so you have to make sure that the truss is carefully planned, made and installed based on the structure’s ‘standards.
Last update on 2023-07-04 / Affiliate links / Images from Amazon Product Advertising API

Hi, I’m Jim. I was a roofing constructor for 20 years, before deciding to start myrooff.com and gather the best content about roofing. I love woodworking and construction and it was only natural for me to start this passion project of mine. Thank you for visitng.