When it comes to roofing underlayment types, choosing the right one is crucial for the longevity and performance of your roof system. In this blog post, we will examine the advantages and installation tips of various roofing underlayment materials such as synthetic, felt, and asphalt.
You’ll learn about the benefits of using different roof underlayment types such as improved durability and protection, increased energy efficiency, and enhanced fire resistance. We will also provide you with essential installation tips to ensure that your chosen roofing materials perform optimally.
Additionally, we’ll discuss common mistakes to avoid when installing underlayment and delve into roof underlayment costs considerations for each type. To conclude, we’ll go over the upkeep demands of different underlayments so you can decide which one is most suitable for your situation.
Table of Contents:
- Roofing Underlayment Types
- Benefits of Using Roofing Underlayment
- Installation Tips for Roofing Underlayment
- Common Mistakes to Avoid When Installing Roofing Underlayment
- Cost Considerations for Different Types of Roofing Underlayments
- Maintenance Requirements for Different Types of Roofing Underlayments
- Frequently Asked Questions Roofing Underlayment Types
- Conclusion
1. Roofing Underlayment Types
Roof underlayments are essential parts of any roof structure, serving as a supplemental barrier between the underlying deck and outer layer of roofing materials. This section will discuss three main types of underlayments: synthetic, felt, and asphalt. When choosing one of the roofing underlayment types, it is important to weigh the pros and cons of each type available.
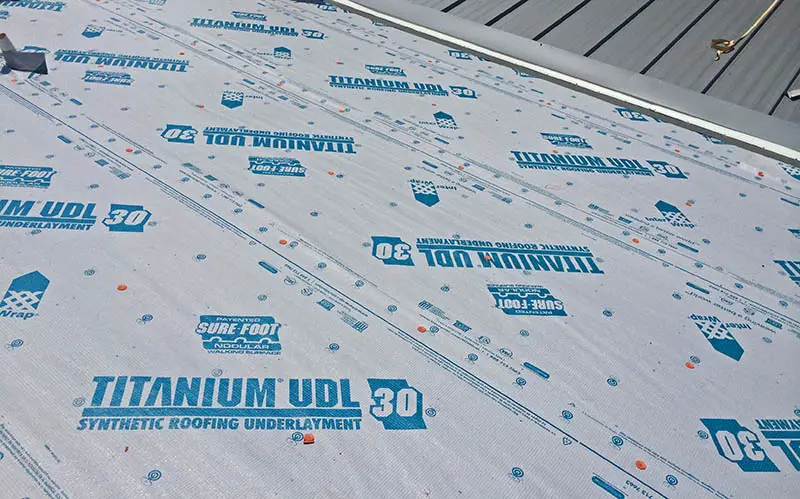
a. Synthetic Roof Underlayment
It is made from high-quality polymers such as polypropylene or polyester, which makes it lightweight yet durable. It offers excellent resistance to water penetration, UV exposure, and mold growth while providing good breathability to prevent moisture buildup in your attic space. Some popular brands include GAF Tiger Paw and CertainTeed DiamondDeck. However, synthetic underlayments can be more expensive than other options.
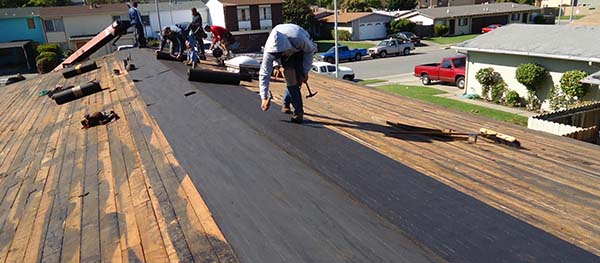
b. Felt Underlayment
It (also known as tar paper) is a traditional choice made from natural materials like wood fibers saturated with asphalt or bitumen for added durability and water resistance. There are two common types: #15 felt (lightweight) and #30 felt (heavy-duty). While less expensive than synthetic alternatives (source), felt may not provide the same level of performance in terms of tear strength, UV resistance, and moisture management.

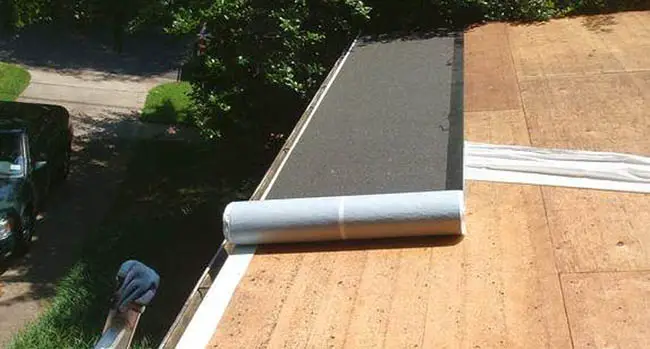
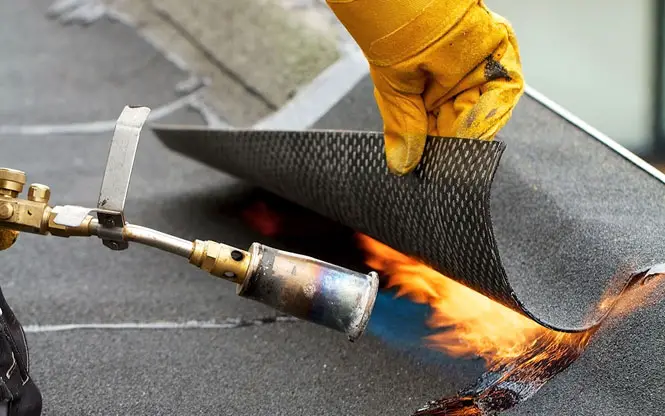
c. Rubberized Asphalt Underlayment
They are made by combining asphalt with rubber polymers to create a highly adhesive and flexible material that can self-seal around nails or staples used during installation. This underlayment is particularly effective in preventing water infiltration in areas prone to ice dams or heavy rainfall, such as Grace Ice & Water Shield. However, it may be more expensive than both synthetic and felt options, and its installation requires special care due to its sticky nature.
The right underlayment type can help ensure the longevity and quality of your roof, so it is important to choose one that meets your specific needs. With its many benefits, installing proper roofing underlayment types for your roof will provide you with greater protection against harsh weather conditions and other potential damage sources.
Key Takeaway:
This section discusses the three main underlayment type: synthetic, felt, and asphalt. Synthetic underlayments are lightweight and durable but can be more expensive. Felt is a traditional choice that is less expensive but may not provide the same level of performance as synthetic or asphalt options.
2. Benefits of Using Roofing Underlayment
The use of underlayment provides numerous benefits to homeowners and building professionals alike. The advantages, such as heightened longevity and protection, better energy efficiency, and augmented fire resistance can be achieved by selecting the right type for your particular roof or climate. By selecting the right roofing underlayment types for your specific roof type or climate conditions, you can maximize these benefits.
a. Improved Durability and Protection
One of the primary functions of the underlayment is to provide an additional layer of protection between your roof decking material and its outer covering (such as shingles or metal panels). This added barrier helps prevent water infiltration that could lead to leaks, rotting wood, mold growth, or other structural damage over time. Furthermore, some roofing underlayment types are designed with specialized features like UV resistance or tear-resistant properties that further enhance their ability to protect your roof from harsh weather conditions.
b. Increased Energy Efficiency
A well-chosen underlayment can also contribute significantly towards improving a building’s overall energy efficiency by reducing heat transfer through the roof assembly during hot summer months while helping retain warmth inside during colder seasons (source).
For example, synthetic option often have reflective surfaces that bounce back solar radiation instead of absorbing it into the structure; this keeps attic spaces cooler in warm climates which reduces cooling costs for homeowners.
- Synthetic Roof Underlayments: Reflective surfaces help reduce heat absorption in warmer climates.
- Roofing Felt: Thicker materials provide insulation against cold temperatures in colder regions.
- Rubberized Asphalt: Can help seal gaps and seams in the roof assembly, reducing air leakage and improving overall insulation.
c. Enhanced Fire Resistance
Another important benefit of using underlayment is its ability to improve a building’s fire resistance. Many roofing underlayment types are designed with fire-resistant materials or coatings that can slow down the spread of flames in case of a fire outbreak (source).
For instance, fiberglass-reinforced synthetic roof underlayment often have higher fire ratings compared to traditional felt products due to their non-combustible nature. By choosing an appropriate type of underlayment for your specific needs, you can enhance the safety and security of your property while complying with local building codes related to fire protection requirements.
The benefits of using underlayment are numerous, from improved durability and protection to increased energy efficiency and enhanced fire resistance. Now that the advantages of this kind of material have been discussed, let’s look at some guidelines for its proper installation.
Key Takeaway:
Underlayment provides improved durability and protection, increased energy efficiency, and enhanced fire resistance. Choosing the right type of underlayment for your specific roof type or climate conditions can maximize these benefits. The synthetic option reflect solar radiation to keep attic spaces cooler in warm climates while thicker felt materials provide insulation against cold temperatures in colder regions.
3. Installation Tips for Underlayment
To ensure a successful installation, we’ll provide guidance on preparing the surface for underlayment application, proper placement of the material, and securement of edges and seams. We’ll also offer advice on avoiding common mistakes during installation.

a. Preparing the Surface for Installation
The first step in installing an underlayment is to prepare the surface by following these steps:
- Clean: Remove any debris such as leaves or dirt from your roof deck using a broom or blower.
- Inspect: Check for damaged areas like cracks or rot that need repair before proceeding with installation.
- Dry: Ensure that there’s no moisture present on your roof deck; if necessary, wait until it dries completely before starting with installation.
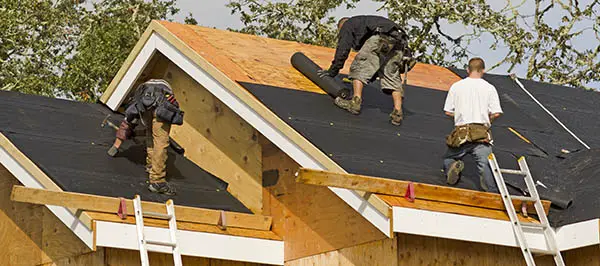
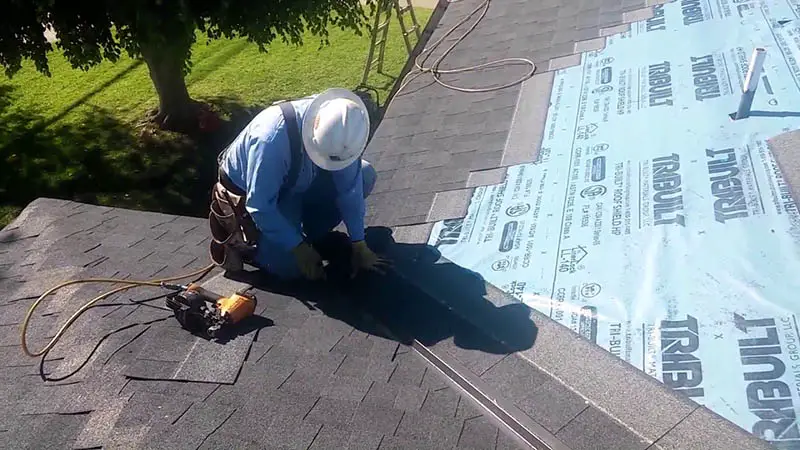
b. Installing the Underlayment Properly
To install different roofing underlayment types effectively, follow these general guidelines:
- Synthetic Underlayments: Begin at one corner of your roof and roll out synthetic material horizontally across its width while maintaining proper alignment along eaves edge (source). Use nails or staples every few inches along overlapping edges according to manufacturer recommendations.
- Roofing Felt (Asphalt-Saturated Felt): Lay felt paper horizontally across bottom edge of roof decking with an overlap of at least 2 inches on each side. Nail or staple felt to decking every few inches along overlapping edges, and continue working up the roof in a staggered pattern (source).
- Rubberized Asphalt Underlayments: Start at bottom edge of your roof deck and peel off backing paper as you unroll asphalt material horizontally across its width. Press firmly onto the surface using a roller or broom for proper adhesion, ensuring that there are no wrinkles or bubbles present.
c. Securing the Edges and Seams of the Underlayment
To secure edges and seams effectively, follow these tips:
- Overlap: Ensure that horizontal overlaps between rows are at least 2-4 inches wide depending on underlayment type; vertical overlaps should be around 6-8 inches wide.
- Tape: Use seam tape recommended by manufacturer to seal any joints where two pieces meet if required by product specifications.
- Nail/Staple Pattern: Follow manufacturer guidelines regarding nail/staple patterns for securing underlayment materials to your roof deck properly (source). This ensures optimal performance during extreme weather conditions such as high winds or heavy rainfall events.
Accurately putting in underlayment is an indispensable measure for guaranteeing that your rooftop will endure. To ensure you get the job done right, be sure to avoid common mistakes when installing your underlayment by following manufacturer instructions and inspecting the surface beforehand.
Key Takeaway:
Proper installation of underlayment is essential for a long-lasting and effective roof. To prepare the surface, clean it with a broom or blower, inspect for damages, and ensure that there’s no moisture present before installing synthetic, felt or asphalt underlayments while securing edges with tape and following manufacturer guidelines on nail/staple patterns.
4. Common Mistakes to Avoid When Installing Roofing Underlayment
When installing underlayment, steering clear of usual missteps can be advantageous in the long term, both financially and timewise. This section will outline some of the most frequent errors made during installation and provide tips on how to prevent them.
a. Not Choosing the Right Type of Underlayment for Your Roof Type or Climate Conditions
Selecting an inappropriate underlayment for your specific roof type or local climate conditions can lead to premature wear and tear, decreased energy efficiency, and even potential damage from water infiltration. To avoid this mistake, research which type of underlayment is best suited for your particular situation before making a purchase.
b. Not Following Manufacturer Instructions Carefully During Installation
Failing to follow manufacturer guidelines when installing roofing underlayment can result in poor performance or even void warranties on both materials and labor. To ensure proper installation:
- Carefully read all instructions provided by the manufacturer.
- Follow any recommended techniques for securing seams, edges, overlaps, etc.
- Contact customer support if you have questions about specific steps or procedures.
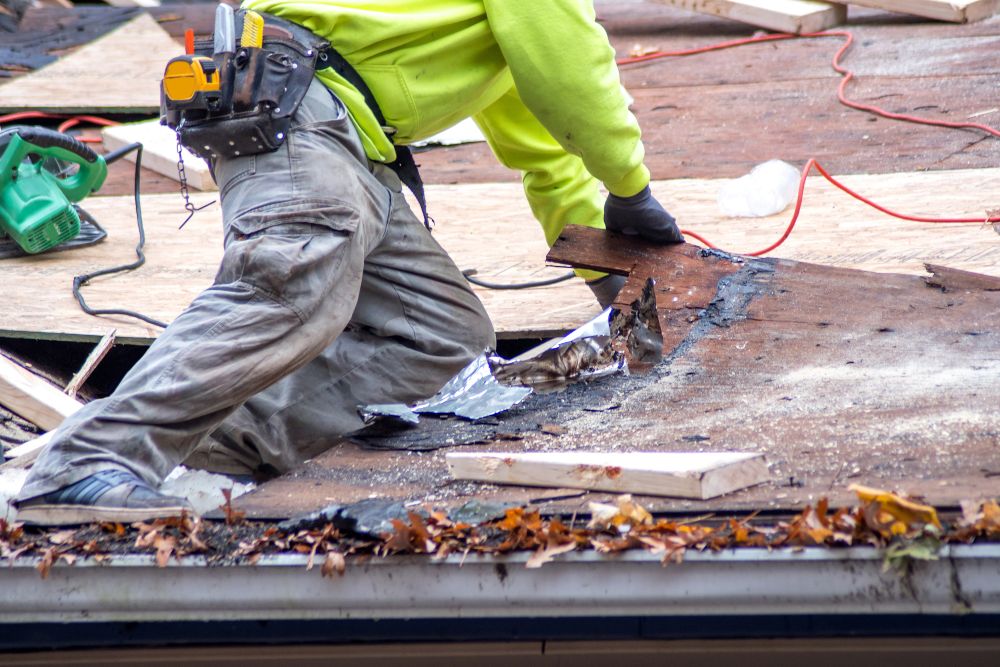
c. Not Inspecting the Surface Before Installing the Underlayment
A thorough inspection of your roof’s surface prior to laying down any new material is crucial in preventing future issues such as leaks or structural damage due to trapped moisture between layers:
- Remove debris like leaves and branches that could puncture your new underlayments,
- Sweep away dust particles that may interfere with proper adhesion,
- Check for any signs of damage or wear on the existing roof surface and make necessary repairs before proceeding with installation.
Be mindful of these errors and take action to prevent them for a successful underlayment installation that can secure your home’s longevity. For more information on choosing the right roofing underlayment types and proper installation techniques, consult resources like Myrooff’s comprehensive guide.
It is important to be aware of the common mistakes that can occur when installing an underlayment, in order to ensure a successful installation. Realizing the financial implications of diverse underlayment options is critical for maximizing your expenditure.
Key Takeaway:
Avoid common mistakes when installing underlayment to save time and money. Choose the right type of underlayment for your roof type and climate conditions, follow manufacturer instructions carefully during installation, and inspect the surface before laying down any new material to prevent future issues such as leaks or structural damage due to trapped moisture between layers.
5. Different Roof Underlayment Costs Considerations
Selecting the proper roof underlayment is essential to guarantee enduring security and toughness, yet it’s likewise important to consider the related expenses of various sorts of materials and work. In this section, we will compare the costs of synthetic, felt, and asphalt underlayments as well as discuss labor expenses involved in installation.

a. Synthetic vs Felt vs Rubberized Asphalt Costs
Synthetic roof underlayment is typically more expensive than traditional felt options due to its higher quality materials and increased performance capabilities. However, these benefits can make it a worthwhile investment in many cases. Synthetic underlayment typically costs between $0.20 and $0.50 per square foot, whereas felt varieties are more affordable at a range of $0.10 – $0.25 depending on standard weights classification. So, it is not wholly one of the expensive types.
Roofing felt underlayment, which includes both #15 (lightweight) and #30 (heavyweight) varieties, tends to be more affordable than synthetic alternatives but may not offer the same level of durability or energy efficiency benefits over time. The cost for felt underlayment ranges between $0.10 – $0.25 per square foot based on standard weights classification. So, it is not wholly one of the expensive types.
Rubberized asphalt underlayment offers superior waterproofing capabilities compared to other options but comes at a premium price point due to its specialized composition that incorporates rubber polymers into standard asphalt products; expect prices around $1 – 1$1 .50 per square foot for this type of material.
b Labor Costs Associated with Installation
Labor costs play an important role when considering overall project expenses related installing roofing . Professional installers typically charge between $35-$75 hour depending expertise experience region country Additionally factors such complexity pitch height roof affect final pricing.
To save money on labor costs, consider obtaining multiple quotes from reputable roofing contractors in your area. Compare the prices and services offered by these roofing contractors.. It’s also essential to ensure that the contractor you choose is licensed, insured, and experienced with installing the specific type of underlayment you’ve selected for your project.
In some cases, DIY installation may be a viable option for homeowners who have experience with roofing projects or are willing to invest time in learning proper techniques; however, it’s crucial to weigh potential savings against risks associated improper installation could lead costly repairs damage long run
Weighing up the cost implications of diverse roof underlayments entails taking into account a variety of elements, such as the material type and associated labour charges for installation. Moving on, maintenance requirements should also be taken into account when selecting roofing underlaymenttypes.
Key Takeaway:
When picking a underlayment, the costs of different materials and labor must be taken into account. Synthetic options are more expensive but offer increased performance capabilities, while roofing felt underlayment tends to be more affordable.
Rubberized asphalt offers superior waterproofing but comes at a premium price point. Labor costs play an important role in overall project expenses, so obtaining multiple quotes from reputable contractors can help save money.
6. Maintenance Requirements for Different Roofing Underlayment Types
Maintaining your underlayment is imperative to ensure its durability and capability of shielding the roof from diverse components like moisture, gusts, and debris. To ensure optimal performance and longevity, regular inspections and cleanings of underlayments are necessary to identify any damage that may need prompt repair.
a. Regular Inspections and Cleanings
Regardless of the type of underlayment you choose, it’s crucial to perform regular inspections at least twice a year – ideally during spring and fall when weather conditions are more stable. These inspections can help identify potential issues before they become severe problems.
- Synthetic Underlayment: While synthetic materials are known for their durability and resistance to mold growth, it’s still important to inspect them regularly for signs of wear or damage caused by extreme weather conditions or debris buildup on the surface.
- Felt Underlayment: Felt materials can be prone to tearing over time due to exposure to harsh weather conditions like heavy rain or strong winds; therefore, make sure you check for any rips or tears during your routine inspection.
- Rubberized Asphalt Underlayment: This type requires minimal maintenance but should still be inspected periodically for cracks or punctures that could compromise its waterproof capabilities.
In addition to visual checks during these inspections, cleaning off accumulated dirt and debris from the surface helps maintain proper drainage while preventing mold growth on all types of underlayments. Here is a comprehensive checklist to help you perform a thorough inspection and cleaning of your underlayment.
b. Repairing Damage Promptly
If you notice any damage during your regular inspections, it’s essential to address the issue promptly to prevent further deterioration or potential leaks that could lead to costly repairs in the future. The repair process may vary depending on the type of underlayment and extent of damage:
- Synthetic Underlayment: Minor tears can be repaired using a high-quality adhesive tape designed for synthetic materials, while larger damages might require replacing sections of the underlayment with new material.
- Felt Underlayment: Small rips or punctures can often be patched up with roofing cement or sealant; however, extensive tearing may necessitate complete replacement of affected areas.
- Rubberized Asphalt Underlayment: For minor cracks or punctures, applying a rubberized asphalt patching compound should suffice; whereas more significant issues might call for professional intervention and possible replacement.
In conclusion, proper maintenance is crucial regardless of which type of underlayment you choose. By conducting regular inspections and cleanings as well as addressing any damages promptly, you’ll ensure that your roof remains protected from various elements while prolonging its lifespan. Here are some tips on how to repair common types of roof damage yourself if needed.
Key Takeaway:
Regular inspections and cleanings are essential for maintaining underlayment, regardless of the type chosen. Synthetic materials require checks for wear or damage caused by extreme weather conditions, while felt can be prone to tearing over time due to exposure to harsh weather.
Rubberized asphalt requires minimal maintenance but should still be inspected periodically for cracks or punctures that could compromise its waterproof capabilities. Promptly repairing any damages is crucial in preventing further deterioration or potential leaks that could lead to costly repairs in the future.
Frequently Asked Questions Roofing Underlayment Types
What are the different types of roofing underlay?
The three main types of underlayment include synthetic, felt, and rubberized asphalt. Each type offers distinct benefits and drawbacks depending on factors such as roof type, climate conditions, and budget.
What is the most common underlayment for roofing?
Felt underlayment is the most common choice due to its affordability and ease of installation. However, synthetic underlayments have gained popularity in recent years because they offer improved durability and weather resistance compared to traditional felt options.
What is the longest-lasting underlayment?
Synthetic underlayments typically last longer than other options since they’re made from high-quality materials like polypropylene or polyester that resist tearing, UV degradation, water absorption, and mold growth. Some premium products can even last up to 50 years with proper maintenance.
Which is better: felt or synthetic underlayment?
Synthetic roof underlayments generally outperforms felt in terms of durability, weather resistance, fire protection ratings (Class A), energy efficiency improvements (cool roofs). However,felt may be more suitable for certain applications such as metal roofs where a breathable material might be preferred over an impermeable membrane like synthetics provide.
Conclusion
In conclusion, roofing underlayment types are an important part of any successful roofing project. Comprehending the advantages and costs linked with each type of underlayment can aid you in making an educated decision when deciding on materials for your roof.
Additionally, following installation tips and avoiding common mistakes will ensure that your roof is properly protected from moisture damage for years to come. With proper maintenance and careful selection of materials, homeowners or professionals alike can rest assured knowing their roofs have been installed using quality roofing underlayment types for maximum protection against weather elements.