Hip roofs or so called hipped roofs are a special type of roof that has a very gentle slope at the sides with a downward pattern towards the side walls.
According to a 2021 study by the National Association of Home Builders, approximately 60% of single-family homes in the United States have hip roofs. This is significantly higher than the percentage of homes with other types of roofs, such as gable roofs (25%), mansard roofs (10%), and curved roofs (5%).
Contents
The area where one section of roof meets other section is considered as the “hip” and the hip roof generally has very uniform angles without any vertical end.
Hip roofs are constructed with four rafters that usually meet on a ridge board that is situated at the middle portion of the roof.
If we consider the rectangular shape of most buildings, then hip roofs will be constructed with two triangular sides and two trapezoidal sides; whereas in the case of square buildings, hip roofs are more commonly pointed toward the top portion while forming a pyramid-like structure.
Some other names for hip roofs are pyramid roof and pavilion roofs; here the mansard roofs, as well as half hipped roofs are small variations of simple hip roofs.
Hip roofs are more frequently used in advanced architectures, most probably for Bungalows, cottages and ranch homes.
These roofs add more qualities to houses, such as traditional designs, solidness and increased comfort. Hip roofs are considered to be one of the simplest designs in the hip roof category.
HIP ROOF DESIGNS
Hip roofs can be designed over square shaped buildings, as well as on rectangular ones; the design of hip roofs can follow triangular sides, as well as a combination of triangular and trapezoidal sides.
Some hip roof designs follow pyramid shapes, whereas others may have more symmetrical structures.
Generally, there are three major factors that contribute in the design or style of a hip roof:
- Eaves:Hip roofs having deep eaves that can assist in shading a window from sunlight; this pattern helps in the cooling of the interior portion of house and ensures a reduction in energy bills with reduced power consumption.
- Strength:For those areas where wind and cyclones are more common; hip roof pitches are constructed with high accuracy so that they can provide durable service for a long time.
- Style: Hip roofs are famous for their unique styles and graceful appearance that adds more beauty to a house’s construction.
HOW TO BUILD A HIP ROOF
As discussed above, hip roofs are constructed with sloping sides so they must be constructed with high precision and safety. Here are few steps that can guide you towards the proper building process of hip roofs:
Step 1: Measurements:
One of the most crucial and basic steps that is involved in hip roof construction is to take measurements prior to installation. It must be done by experienced people with a hip roof calculator; and you have to take measurements along the width and length of a building and it will then be used for calculation of dimensions for ridge board, as well as rafter lengths.
Step 2: Cutting of rafters:
Once you are finished with the measurement part, now it is time to cut the rafters as per these specifications. These pieces will be later used for construction of the roof.
Step 3: Rafter fixing over ridge board:
Ridge boards act like a frame that rests around the roof; you must start your installation procedure by fixing standard rafters onto the required side of the ridge boards.
You have to continue this process till the time the solidness or strength of all of the ridge boards is increased and can be settled as per their weight.
Step 4: Dimensions of Hip rafter:
Before you move towards hip roof building, it is good to ensure the proper alignment as per the angles at the corners. For this type of calculation, you must make use of a framing square that assists in making easy measurements.
Step 5: Continue to attach rafters:
Now is right time to shift toward the fixing of rafters; and experts suggest starting from one side at a time and trying to apply more pressure for each rafter adjustment on board. This pressure will ensure you get much better results.
Step 6: Trim the rafters:
Once nailing of rafters is complete, now you can start with trimming so that they can provide a superior linear layout.
Step 7: Fixing of rip rafters:
In this type of construction, the corner rafters are known as hip rafters and they must be connected to adjacent rafters that are already fixed.
Step 8: Affix and jack rafters:
Once you finish with rafter fixing, it is time to install the jack rafters between the hip rafters and standard rafters.
It is good to start from one portion and then move toward the end; although this process is lengthy, but if performed accurately then it can surely lead to a lifetime of good results.
In case if you do not have proper knowledge of this installation process, then try to take support from experts.
It is important to ensure accuracy because it may further lead to sheathing, ventilation and drainage connections in between.
If the roof also includes a chimney, then you have to undergo some other procedures to assist you in perfect hipped roofing construction.
HOW TO FRAME A HIP ROOF
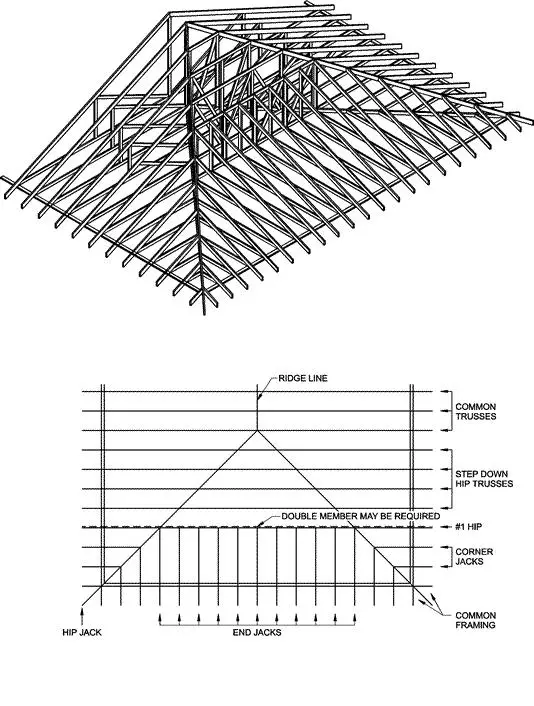
As compared to global roof framing, hip roof framing is more difficult because it consists of four sides with variable lengths instead of two sides. The ridge board is centered here in terms of length, as well as width.
Hip roofs can be generally framed into a large variety of sizes that can be T or L shaped and may need a more complex frame structure.
Here, the roof is divided as well as structured into various parts and major points of connection falls between the ridges and rafters, so the central portion of the roof demands more accurate framing.
Once these rafters are adjusted properly, then jack rafters, as well as common rafters can be placed easily. Framing a hip roof thus demands expertise in this field so that the completed structure can be designed with more accuracy and safety of the house.
Building a hip roof requires proper attention towards some major factors such as measurements, framing and rafter adjustment.
In case if you are thinking of constructing hip roofs for your complicated commercial or residential building, then it is important to construct a superior Hip roof framing plan.
The objective of this plan is to represent direction as well as size variations for the complete construction; this layout plan assists all members to work on different portions of the roof.
Size of the roof generally depends on the type of house and its dimensions; if you are trying to follow a do it yourself procedure for the roof of your home, then it is good to start with a pre-engineered package of hip roof guide.
This guide may help you to ensure proper ventilation, sheathing, guttering, drainage, insulation, adjustment of chimneys and protection from sky lighting.
Various hip roof kits can assist you in this process with quality instructions.
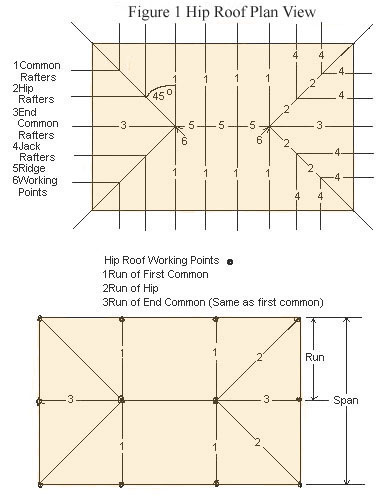
Here, you will get best details if you are searching for how to build a hip roof frame. The angle of hip extension from every corner is probably required to be 45 degrees, but in some cases other angles are also acceptable.
- Start with a layout of a rectangular shape building.
- Locate a centerline at the middle section.
- Now, draw a 45-degree line from each corner toward the centerline that can help to establish location specifications for rafters.
- Draw a ridge line between the intersection points of the hip rafters.
- At last, calculate the distance between the rafters and lay them as per the roof framing plan.
- It is good to construct proper diagrams on paper for designing hip roofs so that these figures can assist you in the proper layout in the next stages.
Hip and valley roof framing is no so complex as compared to hip roof framing procedures; here, roofs are constructed with an angle of 90 degrees:
- First of all, you need to design the layout of building.
- Now, outline the biggest rectangle inside the building layout.
- Now, draw the centerlines for all rectangles that are formed inside.
- Construct a 45-degree line from outside as well as inside corners and extend these lines to intersect the centerline. These lines will indicate the hip rafter locations at the outside corners, as well as on the valley rafters.
- Now, the centerline helps to make connections between the valley and hip rafters.
- Draw solid lines to represent the location of ridges.
- Check the distance between various rafters and then construct a similar layout for the framing plan of the roof.
Using these guidelines for framing of hip roofs one can construct a quality roof at his house that can keep you safe from all adverse weather conditions.
Hip roof styles are considered as the best choice for covering sheds that have horizon type structures. Experts say that this hip roof shed pays the best returns for coastal, as well as windy locations and also provides a very appealing look to property.
At most of these locations you may find square hip roof that provide a unique appearance to a house with additional protection from unwanted natural aspects.
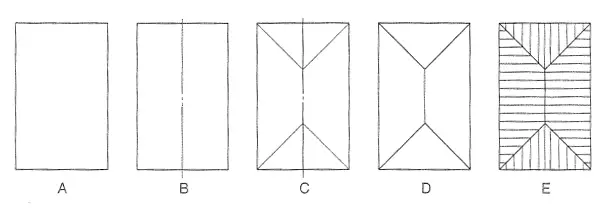
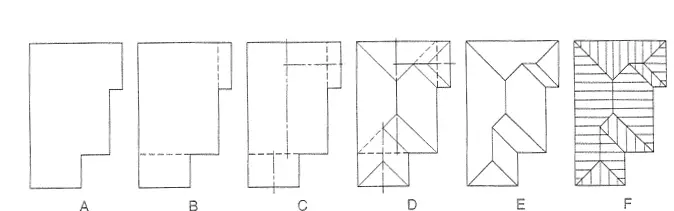
For those who want to make a proper analysis about a hip roof view plan, some figures can provide great help are:
These images can provide complete guidelines in terms of hip roof framing details; the best source to understand such a critical task is pictures.
It becomes easier to follow procedures if we have pictorial representation for every aspect. Although there are many patterns for roofing styles that ensure proper covering of house with added protection from adverse weather conditions.
Here are few advantages of Hip roofs:
- The pyramid shaped hip roofs are highly preferred at hill stations where heavy snowfall is recorded in winter seasons.
- Hip roofs generally have consistent fascia from all directions, so it becomes easy to make installations for gutters.
- Hip roofs are also well suited for warm climates as they create the perfect shade for houses from all sides while assisting in fine cooling.
- Hip roofs also possess eaves along all directions that help to provide complete protection to a house from sun, as well as other atmospheric troubles.
- One of the most important advantages of hip roofs is their ability to provide drainage of water; as all sides of the roof are angled properly so there is no chance of water accumulation on these roofs.
- They help to create prevention from a roof collapsing.
- Hip roofs that have 30-degree tilting are considered as the best designs for long life results.
Few disadvantages are associated with hip roofs are:
- One of the most prominent disadvantages of hip roofs is their typical or complicated construction procedure.
- Hip roofs demand large labor mass, as well as need additional raw material, which adds to more cost.
- They need maintenance from time to time to ensure long life service.
If you are wondering about how to construct a hip roof at your commercial or residential property, then this guide can help you a lot. It includes complete details about rafters, ridges, framing and design basics that can assist people even in do it yourself activities.
Hips are considered better than gable roofs because they keep your house more protected from all ends so that the internal structure can stay safe even in adverse weather conditions.
Hip roofs are not very vulnerable to high wind like gable roofs so they are considered ideal for almost all environmental conditions. Generally, people start with half hip roof framing because it helps to create an easy construction procedure for workers.
With the right hip roof framing prior to starting construction it becomes easier for all workers to maintain perfect alignment at various corners to ensure proper connections of rafters and ridges.
The major purpose of a hip roof design style is to ensure proper protection to the house from all weather conditions with a minimum requirement of maintenance.
These roofs must be capable enough to resist heavy loads of winds, as well as snow, because some areas are highly affected by such environmental factors.
Other important considerations are that it must add more attractiveness towards the structure of the house with some unique designs.