This articles focuses on sshed roof“>hingling a shed roof. The true asset of any house is the roof. A house minus a roof is nothing except a three sided open place which fails to provide the appropriate shelter.
Just like the hairs are to the body, the roof is to the house and therefore it should be taken care of properly. Shingles help in providing an extra layer of protection to the roof from the effects of rain, snow and hail.
Beautifully layered shingles look like an attractive crown on the house.
It is pertinent to note that shingles provide a solid covering to the roof which acts as a roof guard and protects it from water leakages.
It is not so easy to lay shingles, but here in this post we have tried to present it in a simple manner. Take a look at some steps as to how to shingle a shed roof.
For shingling a shed roof, you would require thick shingles, nail gun, measuring tape, chalks, roofing paper, roofing nails, a ladder and a razor to trim the unnecessary portion of the shingles.
STEP 1 ROOFING PAPER: A wall is plastered smoothly with cement to provide an appropriate base before painting; and similar to that the roofing paper is to be applied on the surface of the roof and will act as a base of the roof.
If you are re-roofing, then your roof might have the roofing paper already, but it may have worn down so take off the existing paper and apply the new and durable roofing paper.
STEP 2 LAYERING THE SHINGLES: This is quite a comprehensive process. The strength and the absorbing capacity of a roof is determined by the efficiency of the layering process. It is a vast process involving many phases. To have a deep analysis on how to install roof shingles on a shed go through the steps as listed below:
- Size the shingles properly: The size of the shingles is determined according to the shape of the roof. But generally in a roof the second course is approximately double of first course and the remaining third, fourth and so on courses are of variable sizes to cover the whole roof as the slanting roof narrows towards the top.
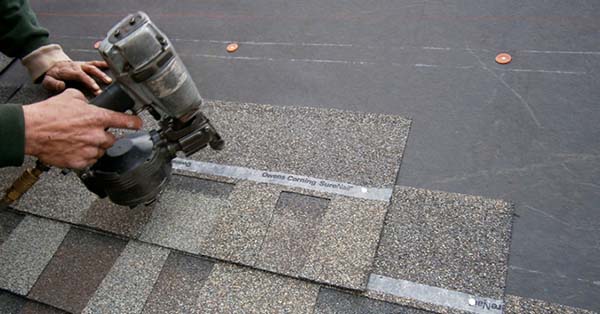
- Begin with the bottom of the roof: Nails are required to be placed properly at the bottom narrow row so that the next rows hold the top edge of the lower row and provide shape to the roof. Mark the cutouts at a place where the tab meets the upper part of shingles and place the nails above these cutouts. The air compressor is to be set to make sure that nails do not mash through the shingles.
- The first row after starter narrow row: When you are done with the placement of nails and lying of the bottom narrow row, mark a line with a chalk over this starting row to help you in putting up the first row. There are manufacturers who supply the first row separately as this row is almost 6 inches (almost 17 centimeters) which is less than the standard size of roof shingles for sheds. Place the first row with the help of nails.
- Laying the second row and so on: the starter narrow row and the first one are a little itchy, but after you are done with that you will find the process easier. For the subsequent rows just chalk out the lines to lay the shingles horizontally straight. You just have to make sure that the bottom of the subsequent tabs touches the top of the slots of shingles lying below. This will leave no space between the shingles and renders appropriate protection. This is how to put shingles on a shed roof one by one and continue this process till you reach the peaks.
- Covering chimneys and vents: The chimneys and vents face the sky and have a different shape. Before covering them with shingles they are to be protected with an extra layer so that their heat won’t run down the shingles. Therefore, a non-corroding metal base flashing using aluminum sheets or using cemented layer of flashing is necessary. This will help in protecting the water from entering the interlaces of shingles.
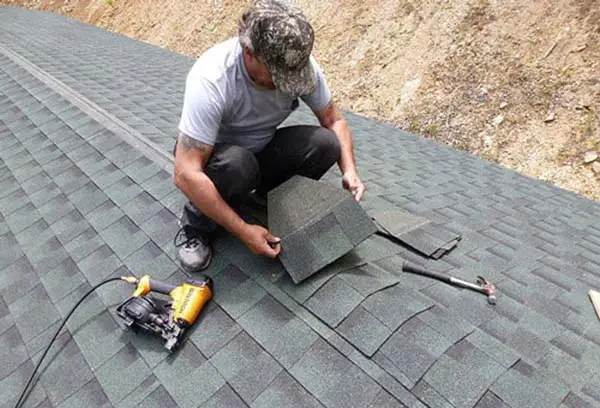
STEP 3 TRIMMING & FINISHING: After applying shingles layer by layer from bottom to top, a narrow space will be left on the top of the roof.
If you think to cover this narrow portion on both the sides of the roof with a sleek layer of shingles, then you are going wrong. Covering both the portions separately would leave the peak edge of the roof uncovered.
Even a single uncovered layer can ruin your roof. You can use the special shingles called ridge shingles to cover this portion or cut the regular shingles into the appropriate size (3-tab shingles) which will cover the area at both sides and then bend it so that it snugly gets fit onto the peak of the roof.
You need to nail this portion with deeper and longer nails, as the peak must keep hold onto several layers. After finishing, you can trim any shingle which appears to be hanging over the edges.
As a matter of general perception, shingling the roof on a warm day is better than a cool day as the heat helps the shingles in adjusting and expanding according to the requirement.
This is how to shingle a gambrel shed roof. The roof may have a shallower and steeper slope and steeper ones have ridge caps. The last ridge caps may have the roof tacks exposed, so it is worth it to cover them with roofing tar to protect it from rusting.
There are alternative patterns of placing the shingles on the roof and you can choose the most appropriate one for your roof.
In this whole process you should take precautions by wearing non-slippery footwear, shades so as to protect your eyes and appropriate gloves to keep your grip strong. Be cautious and stay steady on the roof as any negligence can be disastrous.
Last update on 2023-07-04 / Affiliate links / Images from Amazon Product Advertising API