The pitched roof pergola can be constructed adjacent to the front side of the house, a tall standing wall, etc. The roof structure is considerably slanted downward to create a slope towards the end of a pergola.
Contents
The pitched pergolas are suitable for constructing stylish verandas, patios for a seating arrangement or simply to protect the front door of the house.
If you have all conditions fulfilled in terms of availability of space and permission, here is a short guide on how to build a pitched roof pergola.
CHOOSING A DESIGN FOR THE PITCHED PERGOLA ROOF
You can choose from a wide range pergola pitched roof designs based on factors like available space, local building regulations and requirements.
The pitched roof can be a small one like any walkabout exterior leading to the walkway from the short veranda. This type of roofing is installed to protect the doors and veranda from rainwater, sun rays, etc.
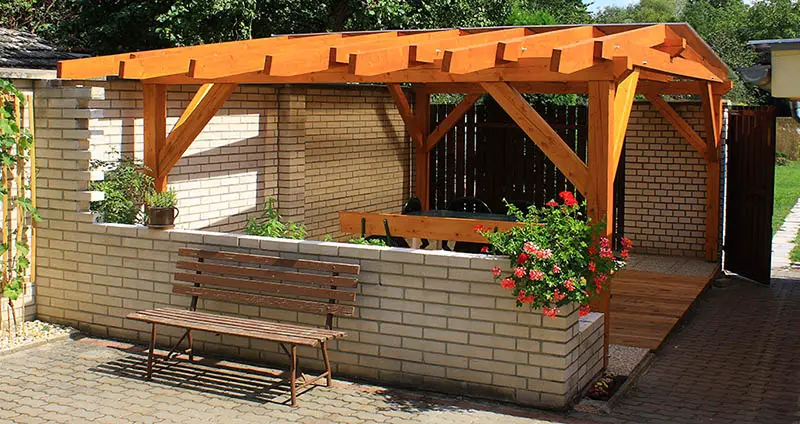
The wide, prairie-style pitched pergola can be used to create an open patio with furniture where you can entertain your guests during a sunny morning or a fabulous evening.
The pitched pergola for a backyard patio can be ordinary, slanted on one side for rainwater drainage and even kept open for an airy private space for the occupants.
Step 1: Install the Posts for the Pitched Roof
The first step begins with digging holes into the ground for installing the posts. These roofs are generally slanted on either sides for creating a slope that helps in proper drainage for the rain and snow.
Dig the holes of equal length of about 1 ft. The distance between the holes should be consistent to offer proper support to the rafters.
Depending on the area of the pitched roof area, there can be 3 to 5 posts. Now, place the posts in the proper holes as per the height and their specific position and add concrete for firm strength.
P.S. Before using the timber wood into the construction process that is going to stay there for years, make sure to apply two or more coats of waterproofing paint all over them. Allow a sufficient time gap between successive coat applications for complete drying.

- LONG-LASTING PROTECTION - Reduce energy fees and lower maintenance costs with Jetcoat Cool King Reflective Acrylic Roof Coating. This fortified, waterproof elastomeric sealant reflects sun rays and keeps your roof cool for years. With Jetcoat’s 5-year protection, you won’t have to worry about reapplying annually. Dries white.
- VARIETY OF SURFACES - Apply this coating to EDPM rubber roofs, polyurethane foam, APP and SBS modified bitumen, asphalt, mobile homes and RV’s, concrete, wood and more. Not recommended for gravel, dead level (flat), or shingled roof surfaces.
- MAXIMUM COVERAGE - Just one gallon of this roof coating will cover approximately 50-70 square feet per coat. We recommend two coats for best coverage. Once dry, your roof will be sealed by a rubber-like cooling membrane that prevents leaks and protects your roofing.
- EASY APPLICATION - When applying this elastomeric roof coating, the temperature must be a minimum of 60°F and rising. Note: Do not apply when temperature is expected to drop below 60°F within a 24 hour period.
- DRYING TIME - This reflective roof coating dries to the touch within 2-3 hours. Please wait 6-8 hours before applying the second coat. For optimal results, do not thin, freeze, or store at temperatures below 50 ºF.
Step 2: Drilling and Screwing Shade Battens
The first batten should be placed on the edge of the pergola. Use the drilling driver to make holes and screw the batten tightly to the pergola. Measure the distance with the spacer to ensure approximate uniformity of space between successive screws.
Step 3: Sizing and Cutting the Rafter Ends
Once you have all the rafters for the pergola with pitched roof ready for fitting, it is important to cut them in equal sizes. Clamp down the rafters to large piece of timber and use the saw to cut down all of them along this timber lining to extract equal pieces.
Rafter Support
In order to ease the proper positioning of the rafters, put a piece of timber beneath the beams.
Step 4: Join the Rafters to the Shade Battens
Starting from the first shade batten on the edge of the roof, screw down the rafters one by one to all the battens to create a strong roofing frame before placing the metal roofing shingles or sheet.
Step 5: Roofing Material Installation
Once the frame is completely ready for the pitched roof, it is time to execute the final step in installing the covering on the frame.
Depending on the chosen material, the material is firmly attached to the frame for robust and durable positioning that lasts for years. For instance, metal roofing sheets are screwed and hammered to the wooden frame. Some people also prefer galvanized fixation for further strength.
For best assurance to get rid of the rainwater, you can install gutters on either sides of the slanting pitched roof.
PREPARING A PLAN FOR YOUR PITCHED ROOF PERGOLA
Before summing up everything, here are some important suggestions for successful construction of your pitched pergola.
Most people encounter difficulties during the construction process without the presence of proper pitched roof pergola plans. You must have a detailed plan before proceeding. Put your plan onto paper in an organized order to proceed accordingly.
This saves you time and money. First, begin with the research on the local laws for building pergola roof and associated tax regulations. Additionally, consider the space you have for the construction.
You can collect some interesting pitched roof designs for inspiration. They are available over the internet and in home décor magazines. It is essential to decide whether you are attempting a DIY project or wish to hire a professional for the purpose.
REGULATIONS FOR BUILDING A PITCHED ROOF PERGOLA
Depending upon the type or pitched roof, size, design and other factors, the property tax can be increased to a certain extent.
The construction permit is also necessary to develop this type of structure joining any building. You can also contact any reputed pitched roof pergola construction expert for more details.
ESSENTIAL MATERIALS AND TOOLS
Timber wood or metal bars for the frame, roofing material such as metal sheets, shingles, non-metallic tiles, Carpenters pencil, hammer, ladder, spade, corded saw, box level, wraparound safety eye protector, drill drivers, etc.
The roofing material can be corrugated metal, shingles, and even non-metallic tiles. The choice of material can greatly influence the longevity and appearance of the structure.
This article is mainly based on installation of wooden frame and posts. If you have difficulty with timber maintenance, then non-rust, high-quality metal can also be used for building the frame of the pitched roof.
Consult your contractor about differences in durability, convenience, maintenance requirements and budget issues to be more decisive on these aspects.
If you have experience with roofing, then trying out DIY ideas is a worthy option for saving money. However, it can be a waste of resources if you are a novice.
There is always a solution if you contact a professional contractor for the project who can provide interesting pitched roof pergola kits, show multiple designs, and complete the work within a short span of time.
Last update on 2023-07-04 / Affiliate links / Images from Amazon Product Advertising API
Comments are closed.