You’ve come here to learn more about flat roof repair. The general consensus is that every flat roof will need to be repaired sooner or later. That’s because water doesn’t run off a flat roof the way it does a peaked or angled roof – it’s simple physics.
Contents
As a result, water has a much easier time of finding leaks, holes or seams in the roof’s surface if it’s just standing there. That’s especially true if you live in an area with very harsh weather conditions.
Over time, the water damage will build up, possibly leading to structural damage and interior damage to your residential building or garage.
So it makes sense to address the topic of a flat roof repair as soon as possible. If not, you may end up dealing with a flat roof replacement.
In general, there are several different reasons for residential roof problems.
- The first reason is if you are living in a location with very sharp temperature extremes and harsh environmental conditions that can lead to a cracked and leaking roof.
- The second reason is that your roof surface simply cannot keep up with rainfall or snowfall, and as a result, standing water on the roof tends to pool in certain areas.
- The third reason is that the roof has simply outlasted its expected lifespan. Even the best roofs can only be expected to last 20-30 years. After that time, the roof technology is essentially outdated and the leaky roof should really be replaced.
Understanding your choices for flat roof repair
When it comes to flat roof repair, the good news is that you have a range of different options. Each of these depends on the type of roof that you currently have, because each type of roof has its own unique characteristics. The four basic types of flat roofs are:
- Metal
- EPDM (Ethylene Propylene Diene Monomer)
- BUR (Built-Up Roof)
- Modified Bitumen
Let’s take a look at each of these roof types in detail to see what you need to know about flat roof repair and how to avoid flat roof replacement. Remember: each type of roof is completely unique.
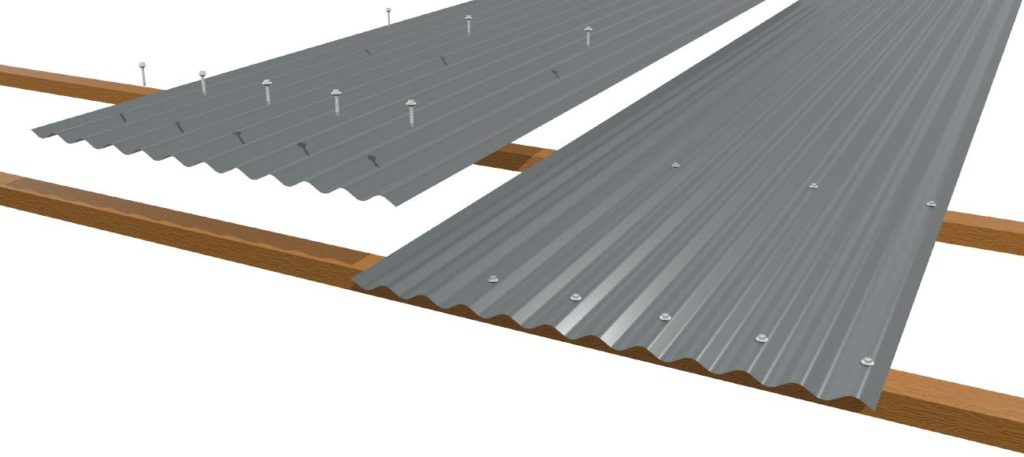
Metal
The metal flat roof is simply the most durable type of roof that you can have. In a best case scenario, a metal flat roof will last anywhere from 25-30 years.
In past decades, metal roofs were made of a tin-steel alloy or copper, but now the metal of choice is aluminum. In general, if your metal roof is leaking, it means that it needs to be completely replaced and not just repaired, and this replacement is expensive.
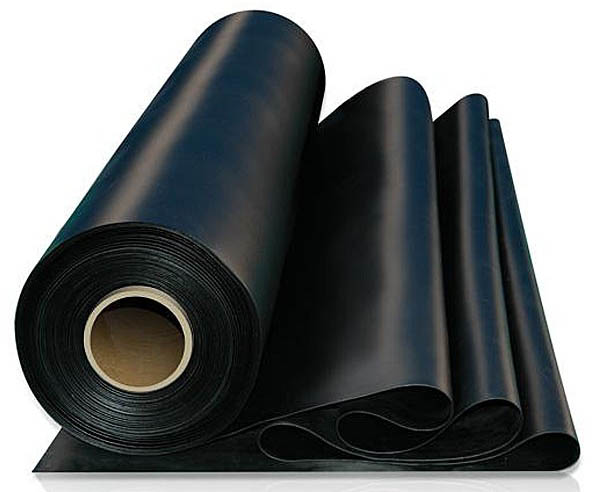
EPDM
By far the most common type of roof that you’ll find is the EPDM (rubber) roof. That’s because it’s the optimal mix of being inexpensive, durable and easy to install. The very long life expectancy of EPDM is what initially attracts people.
In addition, an EPDM roof is considered to be a “green” roof because it’s made of recycled materials. Finally, there’s one other key selling point of the rubber roof – it’s very easy to detect rips, seams or holes when there is a leak.
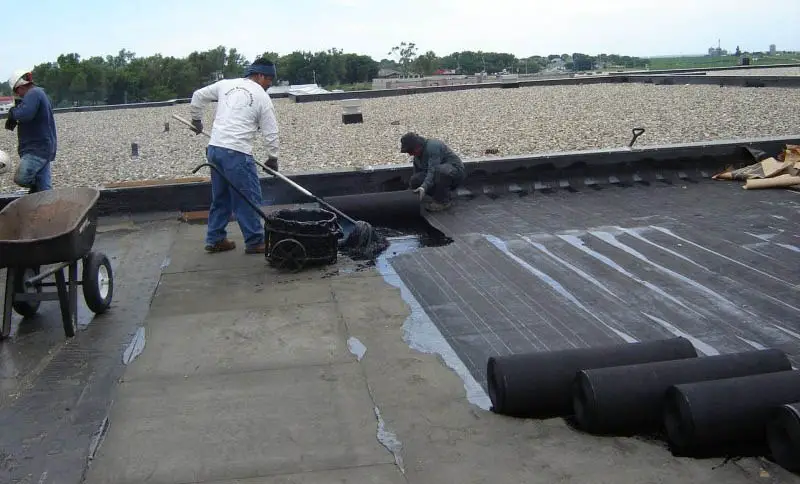
BUR
The built-up roof is made from a mix of hot tar and gravel. It’s not expensive to install and is considered to be more fire retardant than other types of roofs.
There’s one big drawback, though: as a result of all that hot tar and gravel, the BUR roof is a lot heavier than other roofs.
Thus, you need to reinforce the roof and the supporting structure before applying any BUR layer. This adds time and expense to the repair of a roof, and it also makes it harder to find the source of leaks due to the presence of gravel.
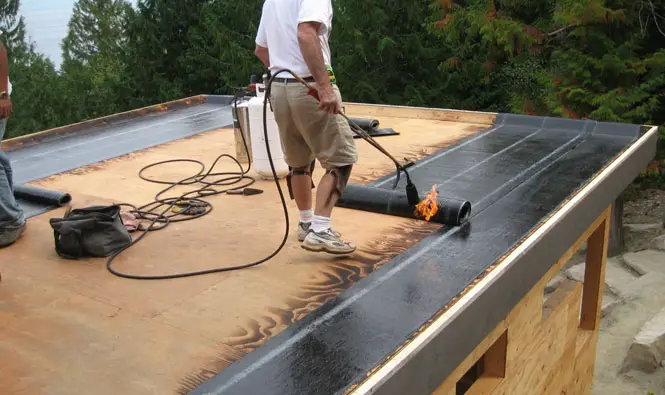
Modified Bitumen
The modified bitumen roof is most similar to a pure asphalt-BUR roof, but it includes extra polymers for protection and an extended lifespan. Thus, it will last longer than a BUR roof but will eventually need to be replaced.
The roof covering is also reflective, which will help you with your energy conservation efforts. Finally, this type of roof is considered to be environmentally friendly.
What you can do in the short term: A flat roof repair
Of course, when you have a leak in your roof probably the last thing on your mind is the exact type of roof you have; you’re focused on getting that leak to stop.
You need to take some short-term measures to protect your roof and limit the damage to your home or standing structure. Here are some tips for a leaky flat roof.
First, you’ll want to get plenty of buckets to hold the water that’s resulting from the leak(s). Secondly, you’ll want to lay a tarp on the roof. This is done to prevent interior damage, especially any damage to your electrical system, walls, furniture, possessions and carpeting.
What you can do in the medium term: Fixing a flat roof
OK, so you’ve isolated the potential source and location of the leak and you’ve also taken steps to protect your home from further damage. The next step is to call the roofing company that installed the roof and have them repair it.
However, that only works if your home is brand-new. If you live in an older home, you’ll need to narrow down the following three options:
- Fix it yourself
- Hire a roofing contractor that specializes in residential flat roofs
- Replace the roof entirely
Of these options, most homeowners opt for one of the first two. It seems much easier and more cost-effective to simply stop the leak using your own tools and best flat roof repair tactics. And, in general, you should only replace your roof if it is already very old.
While the cost of roof repairs is rarely a case of one-and-done, it’s still considerably less expensive to repair a roof than it is to replace a roof.
One DIY tactic that many homeowners embrace as a temporary fix is called a spray applied coating. You apply this spray product (silicone, acrylic, or aluminum) directly to the top of a residential roof.
The spray will come out as a liquid, and it will then cure once it’s allowed to harden and dry. This is actually very useful because it is a quick-and-easy roof repair: simply point and shoot.
The spray coating offers a seamless installation process and can be a real help in amending a flat roof. Sometimes, you can buy this as a kit.
Repairing an EPDM roof
It makes senses that, in order to make changes to an EPDM or rubber roof yourself, you will need EPDM roofing materials. These products and materials include:
- Uncured flashing material
- EPDM rubber membrane
- Cover tape
- Seam tape
- EPDM roof cleaner
- Primer
The problem here is that many – if not all – of these materials are available in the right sizes only to roofing contractors or wholesale distributors. In other words, you can’t walk into a home improvement store and expect to find these materials. And, if you do find them, they will be in bulk sizes.
For example, a rubber membrane typically comes in a 1000-square foot roll. It’s best if you can find a kit with all these products in one place.
You have two basic options when it comes to detection and repair: use a splice adhesive method or use a peel-and-stick method. The preferred and best method is the peel-and-stick method. Here are the steps to follow to fix a flat roof:
Step 1
As a first step, you will need to ensure a few conditions are met. First and foremost, only attempt an EPDM roof repair when temperatures are above freezing (and preferably, above 40 degrees Fahrenheit).
Secondly, ensure that the repair surface is completely dry when you apply the primer and rubber replacement. Often, this means waiting until the sun begins to peek through after a major rainstorm.
Step 2
Clear the roof completely of any debris, dirt or other sealants. This also means removing any old caulk or any other substances that might interfere with a clean seal or detecting what’s causing the problem.
Step 3
The next step is to locate the source of the problem. There may be an obvious source of a leak, like where there is a seam. In general, it’s a safe bet to look for any low spots on the roof, because that’s where the rainwater tends to puddle after a storm.
Standing water is a potential warning sign of a leak (or soon-to-be leak). If a seam coincides with a low spot, then there is a high probability that there is also a leak.
Carefully examine all the corners of the roof, including the areas around chimneys and skylights, as well as any area where there is a roof-to-wall connection.
Step 4
Now comes the detection step. This will help you know how to proceed next. Once you’ve found the leak, it’s now time to prepare the roof surface.
Use an EPDM cleaner to clean the surface thoroughly. If the surface seems to be particularly dirty, don’t hesitate to take a dish brush or some abrasive scrubbing brush to clean the surface.
As a precautionary measure, you can also take a cleaning rag and EPDM cleaner and apply manually. Now let this cleaner dry.
Step 5
After cleaning, the next step is to apply the priming. Using a basic paint brush, take some EPDM primer and apply a thick, even coat to the area that needs to be repaired. You want to make sure that the coat of EPDM primer is not too thick.
The primer should extend at least two inches beyond the edges of the area where you are going to apply the patch. Once you apply the primer, let it dry (approximately 2-3 minutes).
Step 6
You are now ready to apply the patch to the flat surface of the roof. Patching a flat roof is a relatively easy process. Cut the patch so that it extends 2-3 inches beyond the hole in the roof. You can round off any sides with a simple pair of scissors. Then, remove the film backing and apply it gently but firmly to the roof surface.
Make sure that no air gets trapped underneath. Work your way out from one end to another, pressing as you go. You can also use a silicon roller to achieve the same effect.
Step 7
Now comes the part where you need to address any problems on any outside corners of the roof, or areas surrounding a chimney or skylight. As in the earlier step, you will take some primer and let it dry. Then, take a large corner patch (typically 6×8 inches or 7×9 inches in size), fold it in half, and peel off the back half of the patch’s film.
Attach this to the vertical part of the outside corner and wrap it around the corner. Make sure that it’s tightly applied without any air bubbles.
Now, use your fingers to slowly roll it down into the angle where the surface changes from vertical wall onto horizontal roof deck. Do not stretch it there or bridging will occur, and this flashing will not work.
It is very important that this transition has no bubbles where the roof goes from horizontal to vertical plane – otherwise the patch will not work. Make this transition as tight as possible. Then slowly start to apply the remaining flap to the horizontal plane.
Use your fingers to lightly stretch it from the center out and keep rolling it in with your fingers. Continue the process until the entire flap is attached to the roof.
Once the patches have been applied, roll over them with a silicone roller. Roll the edges tightly, and apply EPDM lap caulk along the perimeter.
Step 8
Make any last-minute adjustments and ensure that there are no air bubbles or voids. Clean up any materials or debris that may still be on the roof.
Fixing a BUR or modified bitumen roof
In many ways, it’s simpler to repair a BUR or modified bitumen roof than a rubber roof. The only problem is that it’s harder to spot a leak on a tar or gravel roof than on a rubber roof. These are the materials and products that you will need for a leaky flat roof:
- utility knife
- Tar (in a bucket)
- Asphalt saturated fabric (cotton or fiberglass)
- Plastic trowel
- Dry towels or rags
Sometimes these products can be purchased as part of a kit. Here are the basic steps for fixing this type of leaky roof yourself:
Step 1
As with the rubber roof, you will need to clean the leaking spot thoroughly. This means removing all dirt, debris or caulking. Only then will the problem become obvious.
Step 2
You will now need to apply tar to the roof. You can use a typical plastic trowel for this. Make sure that the tar extends at least six inches beyond the source of the leak and that it is applied evenly and in a relatively thick layer. As a rule of thumb, the tar layer should be one-eighth of an inch thick.
Step 3
You now need to apply reinforcing mesh and some fabric. You can easily find these materials in a home improvement store. Cut out a piece of fabric that is enough to cover the area being repaired and place the piece of fabric in the tar.
Use a towel to set it in, so that the fabric gets saturated with the tar until you see it coming through the fabric. The idea is for the mesh to blend into the tar that you have just applied, giving the roof some extra durability. As needed, apply more tar over the fabric-mesh layer you have created.
Step 4
Obviously, you can’t just leave the mesh and tar exposed to the elements. So you will need to put gravel over the patch. This will help to seal the roof against damage from the elements and sunshine.
When replacing the gravel over the repaired area, use your hands. Make sure you do not use a heavy brush or broom, as that will disturb the repaired area.
Understanding the real cost of flat roof repair
As you can see, the cost of repairing a roof actually includes a lot of different steps. There are the basic costs, such as the cost of materials for patching the hole or leak.
And then there are the additional, more expensive costs, such as fixing or repairing the home’s interior, dealing with wet sheet-rock and repainting damaged ceilings or walls.
Moreover, there are all the indirect costs of roof repair. The biggest “hidden” cost is your time. If you take even a day off work, you’re essentially investing a full day (8 hours) of your time in this project. Assuming a base hourly rate of $20, that’s upwards of $150 in “hidden” (indirect) costs.

Conclusions on DIY flat roof replacement
In the short term, it’s possible to repair your flat roof on your garage or residential property quite easily as a weekend DIY project. The real problem, though, is that there is rarely just a single repair that’s involved. Instead, many homeowners find themselves trapped in a never-ending cycle of roof repair.
In the search for the “final solution,” they then search out more and more expensive solutions, including aluminum roof coatings. Thus, at some point, you need to make a calculation of whether it is better to repair or replace. Contractors can provide some great tips here.
Ultimately, as can be seen above in the step-by-step guide, there is a very defined process to follow when it comes to flat roof repair that can minimize the costs of a damaged roof.
If you follow those steps, take the right measures to prevent long-term structural damage, and understand the factors that impact roof durability, you will have very effectively extended the expected lifespan of your flat roof.
Last update on 2023-07-04 / Affiliate links / Images from Amazon Product Advertising API