For some reason or the other, your roof may be leaking, leading to water seeping into the ceiling. Water in the ceiling is undesirable and can be a significant source of concern and embarrassment, which nobody wishes for. Water dripping from the ceiling could be for different reasons, ranging from improper roof installation, a damaged section, or a damaged pipe or tank on the roof, among others.
In this article, we will run through the possible causes of water leaking to the ceiling, how to locate the source of damage, and the possible actions to remedy the situation.
Contents
- Causes of water damage on the ceiling
- Locating the source of the damage
- Repairing the water damage
- Conclusion
Causes of water damage on the ceiling
Water damage on the ceiling is most likely an indication of a bigger problem. Water damage is caused by two factors mainly, leaky roofs and plumbing problems. Most often than not, the problem arises from the roof due to a weak roof or a cracked and missing shingle. Therefore, we shall be considered the primary and most common causes of water damage.
Poor Installation
Poor installation is a more general cause that covers many different factors. Improper installation can be in the form of poorly installed flashings, poorly sloping roof gutters, inappropriately driven nails, improperly sealed valleys, or poor skylights.
It is essential to hire a roofing contractor with a track record of competence on roofing projects. Additionally, a guarantee or warranty should be gotten from the company over a while to handle any premature problems.
Broken or Missing Shingles
Strong winds, heavy rain, hailstones, or other hard impacts can cause damage to roof shingles, causing a roof leak. As they are the primary protection across roof systems, the shingles bear any damage from impacting materials. Most roofs can withstand impact, but a few can get damaged after successive hits.
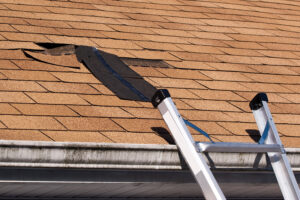
Missing or broken shingles can cause water damage to the ceiling, especially during the rainy season, after a heavy rain, or during the snow. This damage can easily be detected by remains blown away or a gap by visual inspection. Missing shingles cause water to reach the underlay, seep into the roof truss, and the ceiling turns brown.
Age
As they age, roofs get weaker. Irrespective of the roofing material, they begin to show signs of weakness, and leaks are the most prominent after several decades. Due to the effects of weather and sunlight exposure, roofs deteriorate progressively, making it easy for water to seep in through the roofing material.
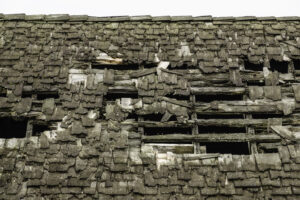
Mostly, the solution to this could require a total replacement of the entire roof. The sooner you repair roof leaks on an aging roof, the better. However, it is better to conduct routine maintenance and make any repairs as soon as the defects are first noticed.
Clogged Roof Gutter
Roof gutters serve one primary purpose which is to drain water away from the roof and prevent any stagnant water. Roof gutters can get blocked with debris such as plant matter or any other organic matter growing along the channel, impeding rainwater flow, causing it to form a pool from which water damage can occur.
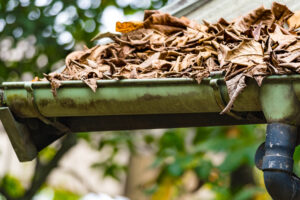
Gutters are crucial to any roof as a good gutter is required to maintain a well-drained roof. Clogged drains can be identified by little water flowing through the downspout, even during heavy rain. Clogged gutters can be decluttered with a ladder and physically clearing the debris by hand or a rod gently. Then pour water to flush any leftover residue. It is essential to clean the gutters occasionally.
Vent Leaks
Roof vents allow hot air to go out, remove excess vapor from your loft space reduce the chances of mold growing inside your home. Without adequate roof ventilation, dampness, condensation, and more will cause dark spots to form around the area causing a musty smell. Leaks from roof vents happen either due to damage to the sealant around the roof vent or a crack of the roof vent.
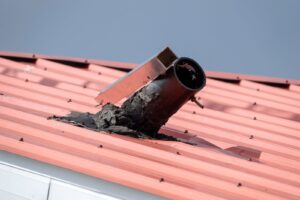
Vent leaks can be identified by inspecting the surroundings of the vent for dark spots underneath where they sit, indicating moisture ingress. You can go further to use a knife to remove the rubber boot around the base of the vent. If there is water or moisture around the rubber or the bottom of the vent, then there is a high chance of a vent leak.
Locating the source of the damage
Suppose you noticed water damage after a significant event such as a typhoon, hurricane, major rainstorms, or winds. It may be best to immediately contact an expert roofing contractor to inspect your room to avoid damaging it further. However, if there is no major occurrence but water damage from the ceiling, you can do the following to locate the source.
Ceiling Inspection
While it may be challenging to find the source of water damage, careful inspection will reveal it. Check for paint bubbling, swelling, peeling, or water stains on your ceiling, especially newer ones after significant rainfall. Examine air vents and fireplaces surroundings for any damp spots on the ceiling.
Check for water leaking directly from the ceiling or even tracing down the walls can be early signs of leaks. Paint and drywall around light fixtures or electrical outlets should be checked for dampness. Also, a damp, musty smell in the attic or upper floors of the ceiling shortly after rainfall in a particular area of the house indicates there is water damage to that area.
For a multistorey building, water on the ground or lower floors can result from a burst pipe or drain in the upper floors. Check the kitchen and bathrooms or any areas with water for any such signs of water or dampness to pinpoint the main cause.
Roof Inspection
Make use of a ladder and flashlight to access the attic and visually follow the trace of water. Watch for black or white stains due to mold or mildew, watermarks, stains, or discolorations on the wood caused by moisture. After that, switch off the light and locate the hole where daylight shows through the roof.
If possible, check during rainfall or use a garden hose to spray water onto the roof, then use a bucket to collect the leak and use tape or any other material to indicate the point of the leak. It is essential to take proper protective precautions and be careful when doing this as it could cause injuries.
Check roof gutters, flashings, and vents for any signs of damage externally as they are likely sources of damage. These are the most common sources of roof leaks. Alongside, inspect the ridge caps, valleys, chimneys, skylights any other elements on the roof. Watch for any curled, cracked, or missing shingles and tent-shaped shingles that cover the angular peaks of the roof.
Repairing the water damage
Depending on the cause of the water damage, you can either complete it as a DIY or contact a competent roofing or plumbing contractor as the case may be. However, it is essential to avoid carrying out repairs if you do not feel up to it. Also, do not attempt a repair while it is still raining as it is unsafe. Mark the spot(s) and try to repair it after the rain has stopped totally.
Ceiling Repairs
Firstly, after locating the source of the water damage, it is crucial to stop the leak and fix the source of the damage to address the root cause of the issue. After that has been done, you can then proceed to fix the ceiling. Next, dry out the affected portions of the ceiling using a strong fan or turning on the home heater.
Before making repairs, put on a nose mask and safety goggles to prevent inhalation of falling materials.
After this, remove damaged portions of the ceiling materials with a scraper or puffy knife. Then cut out the damaged part of the drywall and replace it with new drywall of the same thickness as the existing drywall. Use sandpaper to smoothen any rough portions and fill any small holes with joint compound and smoothen again.
After the repair is dry, cover the damaged section with a sealing primer. The primer blocks water stains and seams and prevents the ceiling from soaking up paint. Without priming, the painting will require more coats of paint. Use at least two coats of primer before applying the topcoat.
Then, repaint the ceiling to restore it to its previous condition. For smaller sections, you can apply the topcoat to the old paint. However, it is advisable to prime and repaints the whole ceiling section to ensure uniformity and avoid any irregularities.
Roof Repairs
After pinpointing the source of water damage to the roof, you need to address the cause of the problem. Roof repairs may range from simple to complex, depending on the source of the problem. It is vital to be comfortable working at height before attempting a roof repair. If all these are satisfied, then proceed to attempt the repair.
If the damage is caused by a damaged roof vent, remove the vent by pulling out the nails that hold the shingles to the vent. Then slightly pull up the shingles around the base of the vent and replace the vent. Cover with a roofing cement to cover the bottom of the vent’s flashing.
In case of a broken or missing shingle, you will have to remove the affected shingle and replace it with another. Gently lift the edges of the neighboring shingle to free the damaged shingle(s), removing the nails with a pincer or nail puller. After removing the nails, then, bring out the affected shingle. Replace with new shingle and hold in place with the right roofing nails.
To fix water damage from flashing damage, depending on the extent of the damage and the location of the damage, you may be able to fix it yourself, have a contractor fix it, or have it fixed as a stopgap before the entire flashing is replaced.
In case of damage to counter flashing around the chimney, employ roof sealants to fix cracks or use glue to hold individual pieces together. If the water damage is caused by step flashing along a sidewall, or a skylight, replace the flashing and the adjoining shingles.
Water damage to the roofs may be due to missing nails that are supposed to connect the shingles between the plastic insulation and the roof. They can be easily fixed by clipping them so that they fall into place and hold the framing appropriately. If nails are missing or worn out, or rusted, you can easily replace those nails with new ones.
Another easy-to-fix source of water damage is damage from burst pipe flashing boot. This often happens to old pipe flashings as they age. Purchase pipe flashing boots of the appropriate length to replace the damaged one and fix it in place. Replacement pipe flashing boots are available in different sizes.
While these address the commonly occurring water damages due to problems emanating from the roof, it does not exhaust the possible damages that could happen. If the damage is from a more complex location, it may be better to contact your insurance provider to provide a roofing contractor to make the repairs.
Finally, water damage caused by an old roof may require a roof replacement. Repairing may not correct widespread water damage but an entire replacement, as in situations of a major catastrophic event.
Conclusion
Water damage to the ceiling can exist for two primary reasons. It is imperative to first locate the genesis of the damage and cut it off before attempting a repair. While repairs to the ceiling may be more uncomplicated and straightforward, those to the roof may be more complex, requiring a professional.
If you can detect the source of the damage and are confident, you can save yourself a few bucks but fixing it yourself, and if not, you can contact a competent roofing contractor to save you the hassles.
19 thoughts on “How to fix that obnoxious water damage to the ceiling”
Comments are closed.