How to shingle a hip roof? Shingling a hip roof on your own can help you save a lot of time and expenses. If you know exactly how to install shingles on a hip roof then you can surely achieve that much desired professional look.
Contents
Getting your shingles redone on your hip roof would not only keep your house in great shape for years to come, but also keeps your roof protected from all of the weather elements.
Installing shingles on a hip roof takes more time than having them installed on any other kind of roof. This is because you need to trim and size more shingles for this kind of roof and lay them around the corners.
Those of you wondering how to figure the amount of shingles for a hip roof need to follow these few given steps and you will learn how to shingle a hip roof by yourself.
PREPARING YOUR HIP ROOF FOR REROOFING
The first thing you need to do is procure the right number of shingles needed for the job. Usually 3 bundles of shingles can cover an area of about 9.29 square meters.
However, it would be wise to measure your roof before you buy those shingles. If you are wondering how to measure a hip roof for shingles, then do the following.
First, take a measurement of the length and breadth of the individual sections of your roof and you can easily determine your exact roof area by multiplying them.
Now, you need to add the area of the individual sections together and then divide it by 100 so as to know the number of roofing squares you will need for the job.
Estimate shingles hip roof
You need to figure the length of a shingle while it lies on the roof so as to determine how they would be lying on the roof width. Generally, asphalt shingles are 3 feet long. So if the width of your roof isn’t an even multiple of the shingle length, then you need to install a partial piece at the end of each row.
Cleaning the roof
Make use of a roofing shovel or a garden shovel to pull off your old shingles quickly. Remove all the metal flashings in the chimney area, valleys and vents.
However, you can keep some of the valleys which are in better shape. Next, you need to clean up your roof. Remove all the nails, reattach the boards which are loose, examine the sheathing and replace the damaged sections.
Preparing the surface beneath the shingles is an extremely important aspect of roofing. A proper cleaning and roof tear up would allow you to see any potential problem which demands attention.
For instance, if you nail the shingles onto a rotten board, then the nail isn’t going to hold.
Now you have to lay the asphalt, water resistant underlayment or felt paper over your roof. The foundation of a sound roof is the proper installation of a good quality roof deck protection.
Now that your roof is all ready for a shingling job, let us come to the most important section of our article viz. how to install asphalt shingles on a hip roof.
As already mentioned earlier, replacing the shingles of a hip roof is going to take a lot more time and effort on your part.
This is because more shingles have to be cut and sized up for your hip roof. Moreover, laying the shingles involves laying them around the edges.
Ideally you should try to match the shingles on your hip roof in a way which would go with the natural flow of your roof. How to shingle a hip roof ridge will be done as follows:
First step: Add protection
If you want to keep your roof from getting potential water damage, then you need to start your roofing project by adding flashing to the ridges and by adding strips of tin to the edges of your hip roof.
Second Step: The first shingle
The second step involves placing the first shingle on your roof. This needs to be done in a way which would allow the bottom of the shingle to lie even with the bottom edge of the hip roof. Now you need to carefully cut the edges of the shingle.
Again, you have to do it in a way so that it matches the angle of the ridge of the hip roof it is lying against.
For instance, if you start on the left hand side, then the left corner of the shingle needs to be cut. Similarly, if you start with the right hand side then you have to trim the right of the shingle. This job needs to be done very carefully and precisely.
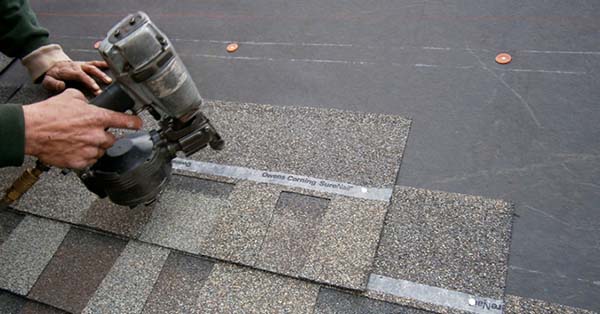
Now that you are sure that your first shingle is correctly lined up with the edge and the ridge of your roof, you have to nail this first shingle onto your hip roof.
The nail needs to be placed on the top edge of the shingle, which should be about one and half inches from the top and sides.
After placing this nail you would need to place another one right at the shingle’s center. However, if you live in a windy region then you need to place 2 nails at the center of the shingle.
Keep on adding the shingles and nailing them down till there is a line of shingles on the bottom edge of your roof. Next, you will have to cut the last remaining shingles in a way that allows you to fit them according to the hip roof angle.
Third Step – Keep on Adding the Shingles
Fourth Step – Caps and glues
In this final step you need to affix the last shingle you have placed on your hip roof with the help of an asphalt roofing cement. This last shingle also needs to be nailed properly to keep it in place.
Nailing the shingle will ensure that the rest of the shingles are secured.
working on the base of the edges of your hip roof by making use of 2 stacked shingles. You need to trim those shingles so that they fit correctly.
Make sure that you start with the first ridge cap lying on the bottom of the ridge of your hip roof. Now, use a single cap at every spot as you go up the ridge.

A few essential roofing tips
One of the most common reasons of failure in a hip roof system is the incorrect installation of the starter shingles.
Starter shingles are your first line of defense against strong winds, so you need to be very careful while installing them.
Nailing errors can also lead to problems with the shingles in the future. Therefore, you need to make sure that the nail type, its length, the force of application and angle are all going in the right way.
Whenever a surface on your roof is intersecting there is a good chance of leaking water. Therefore, flashing is a must if you are interested in waterproofing the critical areas of your roof.
Proper ventilation would help to keep your attic fresh and airy and therefore it’s important for you to install the ridge vents. However, installing the ridge vents involves working on the highest part of your roof, so you should make sure to utilize proper safety equipment to prevent a fall.
Make sure to plan the project in advance and try to have at least one person to help you with the job. Even one single helping hand can create a lot of difference and lead to more effective use of time.
Professional roofing people have their own equipment and techniques for cleaning up the job site. However, when you are undertaking this project on your own you need to adopt a few safety measures.
Shelter the area around your home which might be affected by material dropping during the work. Run a magnet on the drop zone to collect any nails which might have been dropped.
Last update on 2023-07-04 / Affiliate links / Images from Amazon Product Advertising API